
Ron Graham
Puppets and other papier mache creations.
Fine art with paper as medium or support.
A food processor is adequate for small amounts of pulp, however it is quite easy to make pulp beating equipment for beating larger quantities.
Please note that this article is concerned with making pulp for papier mache, not for a paper making vat. The same beater can certainly be used to beat recycled paper to a pulp for hand paper making. However the metals, machinery, water, and workshop cleanliness must be such as to prevent contamination of the pulp. Contamination with traces of oxides, acids, alkalines, and dust, is not an issue for papier mache.
The only thing you will need to make yourself is the beater blade. There is a smaller one to fit an electric hand drill, and a larger one to fit a bench drill.
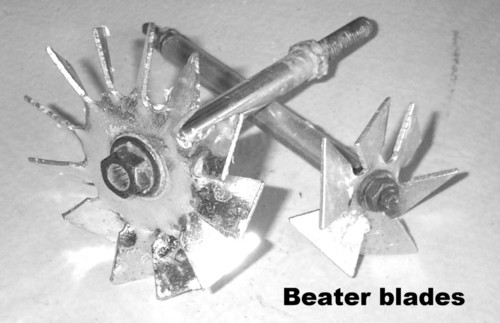
For the shaft, use a 170mm length of 8mm, 9mm, or three-eighth inch threaded rod inserted through a 125mm length of aluminium tubing that passes over the rod snugly. Use a nut and washer either side of the blade to lock it to the rod. Use another nut and washer to lock the tube on to the rod. About 25mm to 40mm of rod should be left exposed at the free end of the shaft. This is to insert into the drill chuck.
Never switch on the drill with the blade inserted unless and until the blade is immersed. Since the blade is designed to beat pulp, it should never be rotated except when doing its job. Also, never rotate the blade when hands are anywhere near it. Never put your fingers into the pulp while the blade is rotating. Use hand, eye, and ear protection as appropriate.
Use warm water, not scalding water, in the bucket to avoid accidental burns. I have no control over the standard of workmanship and safety precautions in your workshop, so I cannot take responsibility for your safety. If you will not observe safe practice, then you do not have my permission to make and use the beaters and methods described on this page.
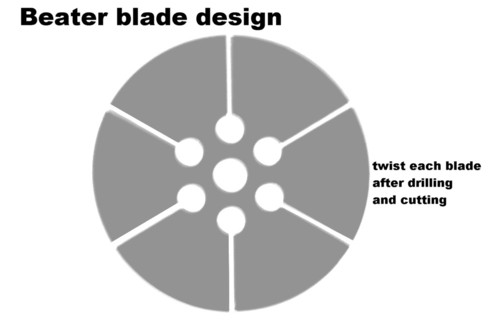
The design is much the same for small and large blades. The only difference is that the larger one has twelve segments whereas the smaller one has six. Make the blades from copper or aluminiumabout 2mm thick.
You can also use iron for the blade if your pulp is only for papier mache. Just paint it with rust converter after the surface has oxidised. If using aluminium, drill the holes where the twists occur a little smaller and a little further away from the center, providing more metal at the twist to ensure sufficient strength. The twist should be about 45 degrees.
The large blade is about 95mm diameter, and the small blade about 60mm. Note that the blades are not sharpened. They are designed to tear at the paper not cut it. This separates the fibres without cutting them up. Longer firbres give greater strength.
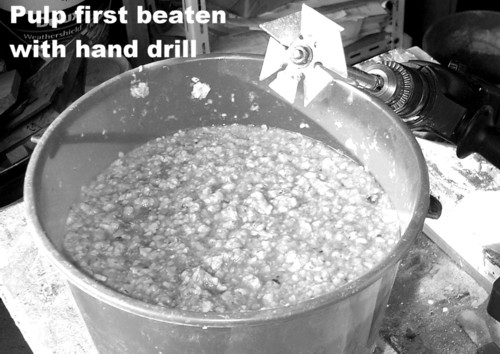
You always have to start beating with a hand drill using the smaller blade. The torn paper is reduced to "half stuff" where a crude pulp is formed and any pieces of paper are very small. At this point the beating can either be continued and finished with the hand drill, or transferred to the labor-saving bench drill which uses the larger beater.
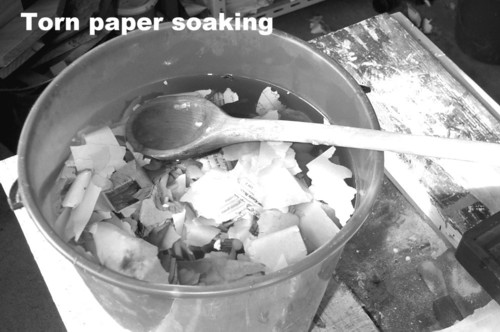
Boil a kettle full of water. Half fill a standard plastic bucket with cold water, then add the hot water from the kettle. Into the warm water, pack torn paper until a mass of it is immersed without much free water. Let the paper soak for a couple of minutes.
Insert the smaller blade into the hand drill chuck and tighten. Put the bucket on the floor and stand or sit with it at your feet. Place the beater blade well down into the mass, until the beater shaft is immersed nearly up to the drill chuck. Hold the drill with both hands and switch it on, being ready to switch it off as soon as paper collects around the shaft.
You will have to switch on and off a few times, clearing the blade each time, until the blade has begun to shred the paper and you can move it around in the mass. The mass should not move violently, but a little sluggishly.
When you hold the drill still, the mass should remain still. It should move when you move the beater in it. You can add some more torn paper, or remove some of the pulp until you achieve this balance. Then continue the beating, stopping from time to time to check that the blade is clearof paper pieces.
If you are using a hand drill only, it should be an industrial quality machine such as tradesmen would use, not a cheap machine for occasional home use. An industrial quality machine will continue to beat pulp for years, whereas the cheap machine will soon break down.
To save labor and wear and tear on your hand drill, a cheap bench drill can take over the beating once the hand drill has reduced the torn paper to very small pieces or "half stuff". Provide stops where the bucket sits to prevent it moving, and ensure that column grips are tightened.
The larger beater blade is used in the bench drill, immersing the shaft almost up to the chuck and having the shaft a little off center to the bucket. As with the hand drill, be ready to switch off if action is violent.
The pulp should rotate fast but smoothly without a lot of pulsing, sucking, and gurgling, let alone a violent erruption. Those problems would mean that the pulp is too thin, and it is a good idea to have a bit of extra "half stuff" on hand to add until the movement is smooth. On the other hand, if it is sluggish, then lift out some pulp or add some water to get the right consistency.
You will find that after doing three or four buckets of pulp, you will begin to guess the consistency right. It is much simpler to make this a matter of judgment rather than a matter for precise measurement. Obviously it is better to err on the thick side, as it is less stressful to thin and motivate a sluggish pulp that just sits there, than to tame and thicken a violent one that wants to jump out of the bucket.

Ten minutes beating in the bench drill should be ample. Do not over beat the pulp, since fibre length gives strength. The pulp is properly beaten when almost no specks of paper remain and the pulp is smooth and glistening. Leave it to stand for a while to let the fibres fully hydrate.
Copyright © Ron Graham 2004,
ABN 20 031 339 748
www.rongraham.com |