
Ron Graham
Puppets and other papier mache creations.
Fine art with paper as medium or support.
A papier mache puppet head
to quickly make at home
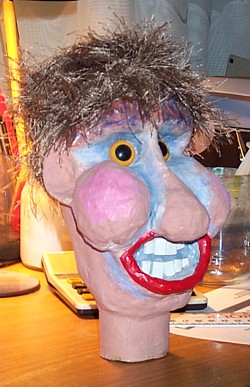
A simple puppet can be easily and quickly made out of paper. My puppets are made from paper pulp with moulds. That’s hard, but you can make a real good puppet, like the one pictured below, without going to all that trouble. Here's how, and have fun.
Here’s what you need...
A puppet head like this is made with only a few simple items...
- A pair of scissors
- A brush for glue
- Bottle of white water-based PVA glue for paper
- Paper masking tape
- A large dish of warm water
- A piece of rag or some paper towell
- A few sheets of newspaper
- A few waste or used envelopes
- A couple of sheets of white photocopy (bond) paper
- A cardboard tube 10cm long and 4.5cm diameter
- A set of paints to paint the face
- Two plastic eyes
- Some scrap wool for hair
A simple puppet can be easily and quickly made out of paper. My puppets are made from paper pulp with moulds. That’s hard, but you can make a real good puppet, like the one pictured below, without going to all that trouble. Here's how, and have fun.
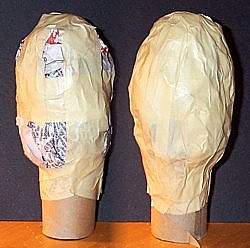
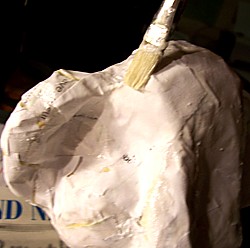
1. Main "egg" of head
Start with your cardboard tube, 3 newspaper sheets (about 60cm by 40cm), and masking tape...
- Scrunch the sheets tightly and separately.
- Arrange them around and over the tube to form a rough egg shape.
- Leave about one fifth of the tube sticking out at one end.
- Wind masking tape tightly around the middle.
- Wind masking tape where the "egg" joins the tube at the bottom.
- From there, stretch masking tape tightly up and over the "egg".
- Stretch more pieces like that, until the "egg" is covered.
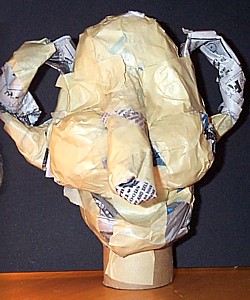
2. Adding facial features.
Using just balls and twists of newspaper stuck on with masking tape, you now add the features to the face. To make a twist, roll paper into a tube first, then twist it tightly. You can double it over on itself to make it thicker.
- Press two dints with your thumbs for eye sockets.
- Stick on two balls of newspaper for the cheeks.
- Using a twist of newspaper doubled over upon itself, form the nose.
- Loop another twist under nose and cheeks to form a chin. Make it as bulky as need be.
- With more twists make rings to begin the ears.
- At this stage the face is a bit floppy and undefined. The next step will take care of that.
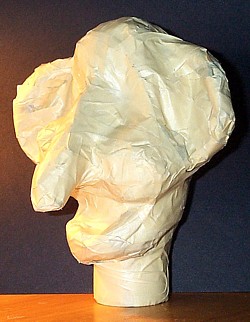
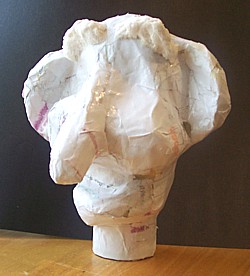
3. Modelling and firming up.
Now you use masking tape and small wads of dry newspaper to model and firm up the face. It is surprising how firm and expressive a shape you can make with just newspaper and paper masking tape. Use the stretchability and slight elasticity of the masking tape to help with modelling and firming up.
- Fill in and model the ears. Keep them in line with the eye sockets. Get most of the waggle out of them.
- Firm up and shape the cheeks, chin, and nose.
- Fill any holes and voids with wads of newspaper and tape over them.
- Don’t be too fussy. Some dints and wrinkles give character to the face..
- Don’t try to make both sides of the face perfectly equal. The rule is "similar but not the same". This is called "assymetry". It imparts an illusion of life when the head is moved.
- So far you have created a basic form using only dry materials. You can now apply the papier mache. You will not be using the pulp method that I mostly use in making my puppets. You will be using the layering method in which you build up a paper skin by pasting pieces of soaked paper in layers.
4. Applying papier mache.
- Brush over the whole surface of the head, except for the neck, with white glue (PVA).
- Take a sheet of good waste paper like envelopes, or photocopy paper, and soak it for a minute in the dish of warm water.
- Lift out the sheet, and put another sheet in the water to soak.
- Tear the wet sheet into pieces. Brush the pieces down onto the glue coated surface of the puppet head. Lay the pieces close to each other. It doesn't matter if they overlap a little here and there, nor does it matter if they wrinkle.
- A good brush to use is a stiff flat number 8 (1 cm or just under half an inch wide). Keep dipping the brush in white glue when you are using it to smooth and press the paper down. You can even use it to pick the pieces up first. Brush glue under edges and over the piece of paper, brushing the piece well down into contact with the surface, eliminating air bubbles. Your fingers and even a teaspoon can assist.
- When the head is covered, paint glue all over the surface again.
- Now do another layer and try to cover any gaps between the pieces of the previous layer.
- When you have done up to five layers, leave the head in a warm airy place to dry. It might take a couple of days.
5. Finishing papier mache.
- When the work is dry, take some strips of dry paper, coat them with glue, and wrap them several times round and round the neck to strengthen it.
- At this point you may want to patch any thin spots, and then do a finishing layer.
- You might find it interesting to use wet tissues and glue for texture on the finishing layer. You can also use the tissues mixed with glue as a pulp for modelling eyebrows, lips, and so forth, although this will take some days to dry.
- When your work is thoroughly dry, you can smooth off here and there with sandpaper or file. A Dremel tool is excellent for finishing. Fill small unwanted dints and crevices with wood filler if you are fussy. A gesso made of white glue diluted a little, powdered chalk, and a little raw linseed oil (optional) can be painted over the dry papier mache for a smoother sandable finish.
- It is not advisable, however, to make the finish too smooth, because a certain “studied roughness” is traditional in layered papier mache for theatre. The roughness also imparts character to the puppet face. A puppet head is made to look good at a distance, rather than to be viewed close up. Furthermore, the method described on this page is supposed to be a quick method, so a lot of tedious finishing defeats its purpose. The puppets shown on this page underwent almost no filling or smoothing at all.
- Note: In papier mache work using white glue (PVA, poly-vinyl-acetate), the glue is usuallly diluted with water. This helps to hydrate (water-soak) the paper. It also makes the wet work less sticky, and the dry work easier to file. Of course it also saves on glue. The method above dilutes the glue by brushing it on to water-soaked paper rather than dry paper. Glue can also be diluted in the jar down to as weak as a 50-50 solution. A drop or two of oil of wintergreen (methyl salicylate) added to the glue is a low-toxicity mould inhibitor. When working with children, use no mould inhibitor, or the less toxic oil of cloves. The method described on this page should not produce any mould issues anyway, so long as the work is thoroughly dried in a warm airy place.
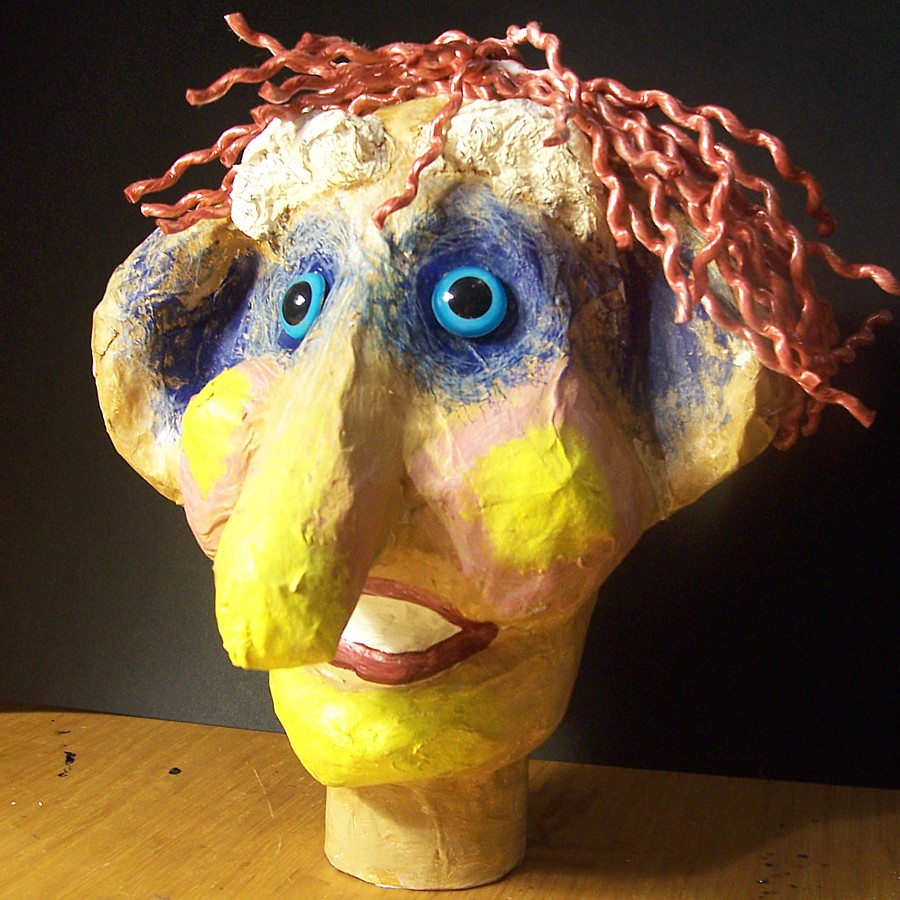
6. Painting and decorating
You are now ready to paint the face, and add the hair and other bits and pieces.
- It’s not a bad idea to coat the whole head with a base coat of acryllic (you can use left over interior house paint) and tint it to a skin colour (eg raw sienna).
- Be bold, bright, and simple. You are not painting a doll’s face. A puppet must look good at a distance.
- Do not try to be realistic. Be expressive. Exaggerate features of the face.
- Paint hollows and crevices in warm dark bluish colours leaning toward purple. Paint bulges and tips in light tones with a warm yellow leaning toward orange.
- Wind wool around a small book, cut once through all strands and tie them together in the middle. Glue this on the head as hair. Shoe laces or unravelled cord or rope can also make interesting hair.
- Add rings, sparkles, and any other decoration you wish.
- Congratulations, your puppet head is finished.
The Finished Puppet
Table of Contents GO
Copyright © Ron Graham 2004,
ABN 20 031 339 748
www.rongraham.com |